STEP BY STEP
How to Pack Your Mosaic Work for Shipping
Story and photos by Shug Jones
3. Measure the inside of the box, and cut four or five sheets of foam to fill the box: top to bottom, side to side. Remove the foam sheets from the box and use a foam spray adhesive to glue two of them together. Place these in the bottom of the box.
4. Center your art on the third sheet of foam. Use a marker to draw around the frame on the foam sheet. Remove the art, and use a sharp utility knife to cut along the marker line and remove the cutout. To form a cradle for your art, apply adhesive to one side of the foam and press it down onto the foam sheets in the box. If your art is deeper than one inch, cut another sheet exactly like the previous sheet, and adhere it to the top.
5. To make removing your art from the cradle easier, you can make tabs from packing tape and apply them to the back of two opposing sides of your work. Make them long enough to stick up above the foam cradle so that they can be grabbed to pull your work up.
6. Place your art in the foam cradle. If there’s space between the top of the art and the top of the foam, cut a sheet of half-inch foam or use several layers of bubble wrap to fill the cut-out to the top. This will keep the art from moving around in transit. To help identify the box as the correct one for your art, tape a photo of the art to the inside of the box flap.
7. Cut two more sheets of foam the size of the box and adhere them to each other, but not to the other foam. Place them on top of the cradled artwork. If your box is not yet filled to the top, add more foam and adhere it to the top layer until the box is full.
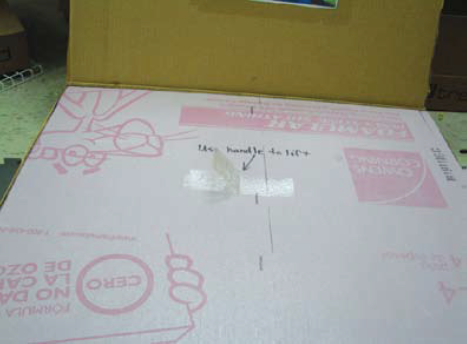
8. Use packing tape to make a tab in the center of the top block of foam sheets to make removing them easy. Write instructions on the foam. Finally, close and completely tape the flap. Seal all edges with several layers of tape. Draw a line around the seam of the three cut edges of the flap and mark to cut tape on the line. Apply FRAGILE and DO NOT LAY FLAT tags to the box. Place a return shipping label and any extra paperwork in a large envelope and tape it to the front of the box. Apply a shipping label, and you are ready to go!
"This article has been published with permission of the Society of American Mosaic Artists (SAMA). The article was first published in SAMA's eJournal, "Groutline" which ended publication in 2021. SAMA Members have access to the full 22 year archive of this digital mosaic art publication. For more information visit, https://americanmosaics.org. "
Your artwork has just been accepted into an exhibit, and you need to get it packed and ready to ship. How can you pack your work and be confident that it will arrive in good condition and be returned to you without damage? I developed the following method and have had very good results. Several exhibit organizers have commented that they like it for the ease of unpacking/packing and the safety of the artwork.


1. Start by measuring your 2-D work: width, height, and depth. Find or purchase a box at least two to five inches larger on all four sides (less for smaller works, more for larger) and at least four inches more than the depth. For larger works, boxes made especially for transporting mirrors can work really well. Purchase one or two sheets of one-inch foam insulation, usually four feet by eight feet.
2. Tape the box completely closed. Then cut the box open from the top on three sides to form a flap.